Lab: * GUI (Desktop) Application – Point and Rectangle
In this chapter we learned how we can make statements with non-trivial conditions. Now let's apply this knowledge to create something interesting: a desktop (GUI) app that visualizes a point in a rectangle. This is a wonderful visualization of one of the tasks from the exercises.
The task that we have is to develop a graphical (GUI) application for visualizing a point and a rectangle. The application must look like identically to the following:
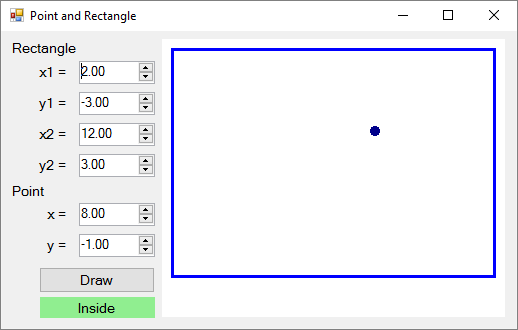
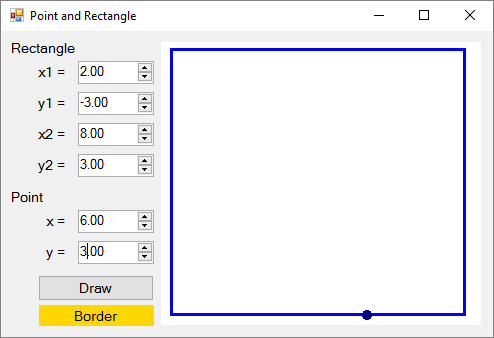
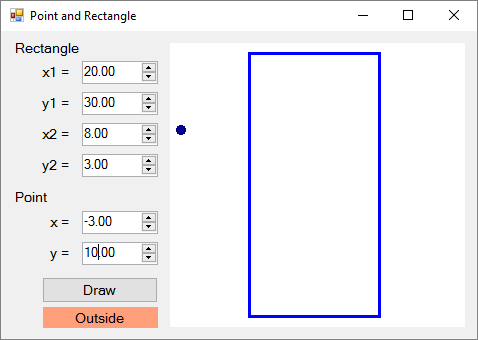
Using the controls on the left we set the coordinates of two of the angles of the rectangle (decimal numbers) and the coordinates of the point. The application visualizes graphically the rectangle and the point and prints whether the point is inside the rectangle (Inside), outside of it (Outside) or on one of its sides (Border). The application moves and resizes the coordinates of the rectangle and the point to be maximum large, but to fit the field for visualization in the right side of the application.
| Attention: this application is significantly more complex than the previous graphical applications, which we have developed until now, because it requires using functions for drawing and non-trivial calculations for resizing and moving the rectangle and the point. Instructions for building the application step by step follow. |
Creating a New C# Project and Adding Controls
We create a new project Windows Forms Application with a suitable name, for example “Point-and-Rectangle”:
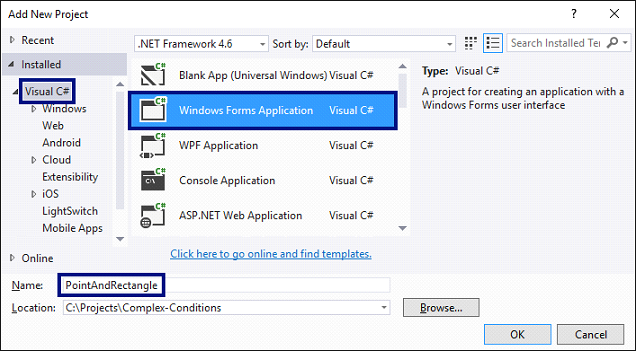
We arrange the controls inside the form, as it is shown in the figure below:
- 6 boxes for entering a number (
NumericUpDown), for thex1,y1,x2andy2coordinates of the rectangle and for thexandycoordinates of the point. - Labels (
Label) before each box for entering a number. - A button (
Button) for drawing the rectangle and the point. - A text block for the result (
Label) – the green box at the screenshot. - A rectangular drawing box (PictureBox) for visualizing the rectangle and the point.
We set the sizes and properties of the controls to look as close as the ones in the picture:
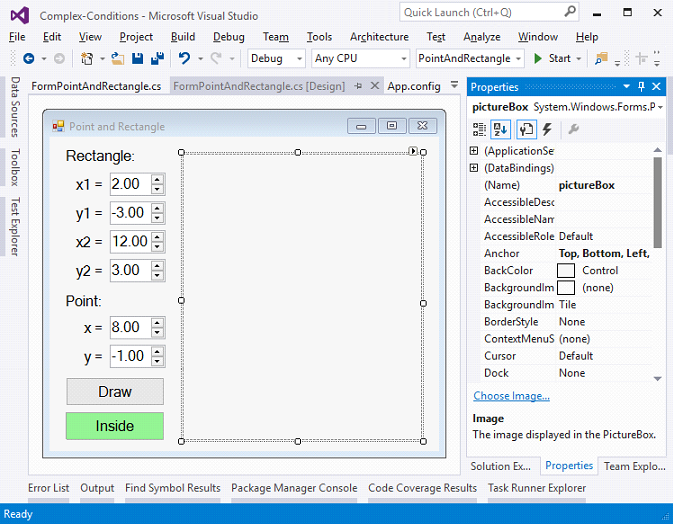
Configuring the UI Controls
We set the following recommended settings of the controls:
- For the main form (
Form) that contains all of the controls:- (name) =
FormPointAndRectangle Text=Point and RectangleFont.Size=12Size=700,410MinimumSize=500,400FormBorderStyle=FixedSingle
- (name) =
- For the fields for entering a number (
NumericUpDown):- (name) =
numericUpDownX1;numericUpDownY1;numericUpDownX2;numericUpDownY2;numericUpDownX;numericUpDownY Value=2;-3;12;3;8;-1Minimum=-100000Maximum=100000DecimalPlaces=2
- (name) =
- For the button (
Button) for visualization of the rectangle and the point:- (name) =
buttonDraw - Text =
Draw
- (name) =
- For the text block for the result (
Label):- (name) =
labelLocation AutoSize=falseBackColor=PaleGreenTextAlign=MiddleCenter
- (name) =
- For the field with the draft (
PictureBox):- (name) =
pictureBox Anchor=Top,Bottom,Left,Right
- (name) =
Handling Events
We have to catch the following events to write the C# code that will be executed upon their occurrence:
- The event
Clickthe buttonbuttonDraw(it is called upon pressing the button). - The event
ValueChangedof the controls for entering numbersnumericUpDownX1,numericUpDownY1,numericUpDownX2,numericUpDownY2,numericUpDownXandnumericUpDownY(it is called upon changing the value in the control that enters a number). - The event
Loadof the formFormPointAndRectangle(it is called upon starting the application, before the main form is shown on the display). - The event
Resizeof the formFormPointAndRectangle(it is called upon changing the size of the main form).
All of the above-mentioned events will execute the same action – Draw(), which will visualize the rectangle and the point and show whether it's inside, outside or onto one of the sides. The code must look like this:
private void buttonDraw_Click(object sender, EventArgs e)
{
    Draw();
}

private void FormPointAndRectangle_Load(object sender, EventArgs e)
{
    Draw();
}

private void FormPointAndRectangle_Resize(object sender, EventArgs e)
{
    Draw();
}

private void numericUpDownX1_ValueChanged(object sender, EventArgs e)
{
    Draw();
}

 /* TODO: implement in the same way event handlers
    numericUpDownY1_ValueChanged,
    numericUpDownX2_ValueChanged,
    numericUpDownY2_ValueChanged,
    numericUpDownX_ValueChanged and
    numericUpDownY_ValueChanged */

private void Draw()
{
    // TODO: implement this a bit later …
}
Printing Point Position Compared to the Rectangle
Let's begin from the easier part: printing the information about the point's position (Inside, Outside or Border). The code must look like this:
private void Draw()
{
    // Get the rectangle and point coordinates from the form
    var x1 = this.numericUpDownX1.Value;
    var y1 = this.numericUpDownY1.Value;
    var x2 = this.numericUpDownX2.Value;
    var y2 = this.numericUpDownY2.Value;
    var x = this.numericUpDownX.Value;
    var y = this.numericUpDownY.Value;

    // Display the location of the point: Inside / Border / Outside
    DisplayPointLocation(x1, y1, x2, y2, x, y);
}

private void DisplayPointLocation(
    decimal x1, decimal y1, decimal x2, decimal y2, decimal x, decimal y)
{
    var left = Math.Min(x1, x2);
    var right = Math.Max(x1, x2);
    var top = Math.Min(y1, y2);
    var bottom = Math.Max(y1, y2);
    if (x > left && x < right && …)
    {
        this.labelLocation.Text = "Inside";
        this.labelLocation.BackColor = Color.LightGreen;
    }
    else if (… || y < top || y > bottom)
    {
        this.labelLocation.Text = "Outside";
        this.labelLocation.BackColor = Color.LightSalmon;
    }
    else
    {
        this.labelLocation.Text = "Border";
        this.labelLocation.BackColor = Color.Gold;
    }
}
The code above takes the coordinates of the rectangle and the point and checks whether the point is inside, outside or on the borders of the rectangle. By visualizing the result, the color of the background of the text block that contains it is changed.
Think about how to finish the uncompleted (on purpose) conditions in the if statements! The code above purposely doesn't compile, because the purpose is to make you think about how and why it works and finish on your own the missing parts.
Visualization of the Rectangle and the Point
What remains is to implement the most complex part: visualization of the rectangle and the point in the control pictureBox with resizing. We can help ourselves with the code below, which makes some calculations and draws a blue rectangle and a dark blue circle (the point) according to the coordinates given in the form. Unfortunately, the complexity of the code exceeds the material learned until the present moment and it is complicated to explain in detail exactly how it works. There are comments for orientation. This is the full version of the action Draw():
private void Draw()
{
  // Get the rectangle and point coordinates from the form
  var x1 = this.numericUpDownX1.Value;
  var y1 = this.numericUpDownY1.Value;
  var x2 = this.numericUpDownX2.Value;
  var y2 = this.numericUpDownY2.Value;
  var x = this.numericUpDownX.Value;
  var y = this.numericUpDownY.Value;

  // Display the location of the point: Inside / Border / Outside
  DisplayPointLocation(x1, y1, x2, y2, x, y);

  // Calculate the scale factor (ratio) for the diagram holding the
  // rectangle and point in order to fit them well in the picture box
  var minX = Min(x1, x2, x);
  var maxX = Max(x1, x2, x);
  var minY = Min(y1, y2, y);
  var maxY = Max(y1, y2, y);
  var diagramWidth = maxX - minX;
  var diagramHeight = maxY - minY;
  var ratio = 1.0m;
  var offset = 10;
  if (diagramWidth != 0 && diagramHeight != 0)
  {
    var ratioX = (pictureBox.Width - 2 * offset - 1) / diagramWidth;
    var ratioY = (pictureBox.Height - 2 * offset - 1) / diagramHeight;
    ratio = Math.Min(ratioX, ratioY);
  }

  // Calculate the scaled rectangle coordinates
  var rectLeft = offset + (int)Math.Round((Math.Min(x1, x2) - minX) * ratio);
  var rectTop = offset + (int)Math.Round((Math.Min(y1, y2) - minY) * ratio);
  var rectWidth = (int)Math.Round(Math.Abs(x2 - x1) * ratio);
  var rectHeight = (int)Math.Round(Math.Abs(y2 - y1) * ratio);
  var rect = new Rectangle(rectLeft, rectTop, rectWidth, rectHeight);

  // Calculate the scaled point coordinates
  var pointX = (int)Math.Round(offset + (x - minX) * ratio);
  var pointY = (int)Math.Round(offset + (y - minY) * ratio);
  var pointRect = new Rectangle(pointX - 2, pointY - 2, 5, 5);

  // Draw the rectangle and point
  pictureBox.Image = new Bitmap(pictureBox.Width, pictureBox.Height);
  using (var g = Graphics.FromImage(pictureBox.Image))
  {
    // Draw diagram background (white area)
    g.Clear(Color.White);

    // Draw the rectangle (scaled to the picture box size)
    var pen = new Pen(Color.Blue, 3);
    g.DrawRectangle(pen, rect);

    // Draw the point (scaled to the picture box size)
    pen = new Pen(Color.DarkBlue, 5);
    g.DrawEllipse(pen, pointRect);
  }
}

private decimal Min(decimal val1, decimal val2, decimal val3)
{
  return Math.Min(val1, Math.Min(val2, val3));
}

private decimal Max(decimal val1, decimal val2, decimal val3)
{
  return Math.Max(val1, Math.Max(val2, val3));
}
In the code above we can see a lot of conversion of types, because different types of numbers are used (decimal numbers, real numbers and integers) and sometimes it is required to do conversion between them.
Compiling and Testing the Application
In the end we compile the code. If there are errors, we eliminate them. The most probable reason for an error is an inconsistent name of some of the controls or if writing the code in the wrong place.
We start the application and test it. We enter different data to see whether it behaves correctly.
If you have problems with the sample project above, feel free to ask in the SoftUni official discussion forum (https://www.reddit.com/r/softuni) or in the SoftUni official Facebook page (https://fb.com/softuni.org).